2

My blog has moved!

3

You should be automatically redirected in 6 seconds. If not, visit
http://makingchickensalad.com
and update your bookmarks.

4

cheep! cheep!

please meet the three new babies at our house, chick, chickie and miss chickie (named by henry, of course...).

i have wanted chickens for awhile, but resisted until recently reading Made From Scratch: Discovering the Pleasures of a Handmade Life, by Jenna Woginrich . although i am not ready to jump on the self-suffiency/homesteading bandwagon fulltime, i sincerely appreciate jenna's effort to promote this lifestyle and make it accessible to a generation used to hopping in the car and heading to the store for anything and everything. personally, i LIKE cooking and making things from scratch, and feel when i focus on the projects and people within the walls of my home i have less time to worry about the things in all of our lives, over which we have no control.
bad economy? no jobs? global warming? terrible issues, all of them. pardon me, for not worrying any more than i already have (it's been a lot). for now i will be peering over the edge of a box watching newborn chicks do nothing more than peck at pine shavings, enjoying sights like this

and feeling that at least for now, all is right in our little world. even if it is a little blurry. :)

pretty dish towels


If you love these
as much as I do but are looking for more of a bargain, check out the dishtowels at Cost Plus. The selection I found in the store was much nicer than on the website and so far I love them, as they are super thick and absorbent and wash well.

TUTORIAL: Embroidered Fabric Labels


This year I want to keep things organized, and with that in mind I have been affixing labels everywhere I can. I am using these labels in the kitchen, but they work anywhere!

For this project you will need the following MATERIALS:
*cute fabric
*fusible web
*adhesive back fabric sheets (i used these)
*embroidery floss (in a color that nicely contrasts your fabric)

and these TOOLS:
*embroidery needle
*scissors
*iron, ironing board and press cloth

Step 1:


Embroider you word or design.

Step 2:


Following the manufacturer's instructions, adhere your fusible web to the back side of your fabric label. I used a press cloth in order to protect my embroidery.

Step 3:

Remove paper backing to reveal sticky stuff.

Step 4:


Position fabric label on fabric paper and fuse with your iron. Again, I used a press cloth here to protect my embroidery (not shown in photo).

Step 5:

Cut out your label.

Step 6:


Remove paper backing and affix label to your clean, dry surface. Make sure to gently push and bubbles out toward the edges.

All done!

P.S. If you have any extra little scraps of sticker-backed fabric you can cut them into shapes to make stickers.

They are especially cute for scrapbooks and notecards.

almost time to choose the winner!

this is just a reminder that entries for my OWOH giveaway will no longer accepted after 3 p.m PST today, and the winner will be announced tomorrow morning. Thank you so much to everyone who has entered!

...Lovely... doll


made of needle-felted wool and securely fastened to a wood base. more photos can be seen here...

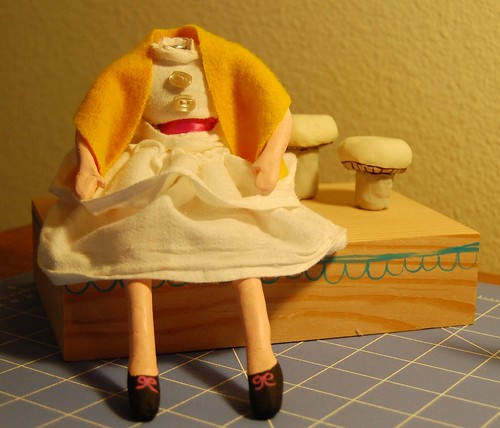
work in progress...


work in progress, originally uploaded by makingchickensalad.

this is what i have been working on for the past few days. at this point i am not thrilled with her AT ALL, but am happy enough to move forward and to feel confident that i will like her in the end. as this is new for me, my ideas are more advanced than my skills will allow and i have been having a tough time with her head (obviously!). some good advice from Sheri and patience with myself and the learning process should hopefully help the progression of this project and give this poor little thing a proper head!