Experimenting with Fabric Painting
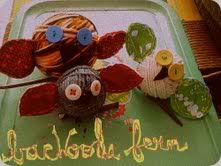
I have been experimenting with painting fabric for pillows and some other sewn items around the house. This canvas was way too stiff and thick, but the process is fun and has potential. I think I'll experiment with lighter weight cottons and silk next.
Labels:
stuff i make
On Self-Sufficiency and Sustainability Part One: Grow Your Own Food
With the move to the new house being the chance to wipe the slate clean and carry over only the elements of the old house that we love and use regularly I have really been examining how we live. Not only am I talking about the STUFF we take, but also the HABITS and ways of DOING things. My uncle introduced me to the blog and website of the Dervaes family, and I have been thinking a lot about this chart I found on their site and how many of these elements can realistically be incorporated into our lives. The point is not to try to change everything at once--that would be completely overwhelming and unrealistic. The Dervaes Family has been living this way for over 20 years and acknowledges that it is an ongoing process and not something that can happen overnight. But the more you incorporate these things at a slow pace over time the more likely they are to naturally become part of daily life and less of an inconvenience or something that is so much of a burden that it will be abandoned.
I will take a look at each of the 10 steps in a separate blog post, starting with #1: Grow Your Own Food.
#1. GROW YOUR OWN FOOD
Since most of the construction and projects going on inside the house are not really anything I am qualified to handle, my efforts have been concentrated on the yards, both front and back. One of the first things I did was to gather up all of the random cinder blocks around the property to build two planter beds in the enclosed garden area. I have cauliflower, pumpkins, cucumbers, potatoes, red peppers, zucchini, tomatoes, corn and lettuce in the beds.
As well as a fig tree...
a peach tree (and an apple as well), which will be espaliered on the fence behind it...
almonds...
a baby olive tree...
and a few herb gardens with basil, mint, thyme, sage, lavender and rosemary.
It will take a lot more work and a few more years of tackling projects one by one, but the goal is to have something similar to the Beerhorst Family above
or the Dervaes family above and below.
Whether you live in an apartment with an herb box in the window or on acres and acres with a full scale farm, you are taking steps to be less dependent on others and at their mercy as to how they grow the food you eat.
Labels:
dervaes family,
path to freedom,
self-sufficiency
Putting the New House Together, One Text Message at a Time
The new house has come together little by little over the past few months. Here is an idea of the process, as told via the text messages I have sent...

FINALLY!!!
***

scrapin' linoleum!
***

first purchase! $1.50 at my favorite thrift store.
***

dining chairs arrived
***

appliance shopping sucks. refrigerators are hideous.
***

we found a stove!
***


we found a fridge! lazy susan shelves=awesome.
***

yes, please! the lady at the fancy lighting store sure was pissed i bought this instead of something out of her expensive catalog! it's going above the kitchen sink.
***

kitchen flooring=chosen.
***

carpet=chosen (gray squirrel)
***

(to josh) i want this sink. make it work!!
--note: it wouldn't fit. :(
***

new doors and hardware are here!
***

josh had a freakout about the stove we bought and brought home another one. i thought he was crazy but this one is way nicer and has the salt and pepper shakers. bonus!
***

bye-bye creepy weird swirly texture. hello, smooth walls!
***

new sink & backsplash.
***

swing=hung. henry=happy
***

had the bathroom mirror put together this morning before the boys were even out of bed. gettin. shit. done.
***

need to choose a kitchen cabinet color. help!!!!!!!!!!!!
***

estate sale chippendale for the family room. upholstery ideas?!?!?!?!
***

family room light fixture
***

cabinets are built! josh=superhero.
***

for henry's room.
***

lego storage from homegoods.
***

henry's room has stuff in it!
***

but that first stuff was a little too girly so now it had different stuff.
***

this is totally what those pouf things are for, right?!?

FINALLY!!!
***

scrapin' linoleum!
***

first purchase! $1.50 at my favorite thrift store.
***

dining chairs arrived
***

appliance shopping sucks. refrigerators are hideous.
***

we found a stove!
***


we found a fridge! lazy susan shelves=awesome.
***

yes, please! the lady at the fancy lighting store sure was pissed i bought this instead of something out of her expensive catalog! it's going above the kitchen sink.
***

kitchen flooring=chosen.
***

carpet=chosen (gray squirrel)
***

(to josh) i want this sink. make it work!!
--note: it wouldn't fit. :(
***

new doors and hardware are here!
***

josh had a freakout about the stove we bought and brought home another one. i thought he was crazy but this one is way nicer and has the salt and pepper shakers. bonus!
***

bye-bye creepy weird swirly texture. hello, smooth walls!
***

new sink & backsplash.
***

swing=hung. henry=happy
***

had the bathroom mirror put together this morning before the boys were even out of bed. gettin. shit. done.
***

need to choose a kitchen cabinet color. help!!!!!!!!!!!!
***

estate sale chippendale for the family room. upholstery ideas?!?!?!?!
***

family room light fixture
***

cabinets are built! josh=superhero.
***

for henry's room.
***

lego storage from homegoods.
***

henry's room has stuff in it!
***

but that first stuff was a little too girly so now it had different stuff.
***

this is totally what those pouf things are for, right?!?
Two Steps Forward

Well, the good news is, that after some frustrating hours reading (and re-reading) the macrame lawn chair instructions I FINALLY figured out how to do it. It was actually once I stopped reading the instructions and just studied the photo of each step that everything clicked. Luckily once you get the hang of it this is a fairly simple and surprisingly quick project, since a few rows after I took the photo above Josh pointed out that I had missed one of the bars on the seat with my initial (vertical) cord and would have to undo everything and start over. Oops. Guess I know what I will be doing this weekend.
Labels:
macrame lawn chair
Cute Scrapbook Idea


Spotted this great idea from the people at Fossil on BlueMossGirls. I have always admired the work of creative girls like Mandi and Jen but when I try it just looks contrived and I get annoyed. This seems like a perfect, no-fuss way to finally get around to organizing baby photos and mementos and getting them out of the shoe box and into the open where they can be enjoyed.
I May Be Taking This a Little Too Far...

It all started pretty innocently with this thrifted planter a few years ago...

And, then this behemoth somehow made its way home. It is so scary that I couldn't bring myself to hang it in the house and have banished it to the patio. That driftwood up top is HEAVY, and it's hard to make out but there is a giant feather tucked into the rope on top of the driftwood.

This was folded up in a garage at an estate sale and I bought it without even opening it to see what the pattern was--I just knew it would be great, no matter what. Oh. 49ers? Awesome. But, now I was intrigued...

And found some images like this...

and this on eBay. I found a fantastic tutorial and so many cool patterns that I'm having a hard time deciding which to use. Oh, yes--I bought a giant lot of turquoise and cream macrame cord on eBay and am planning on transforming two beat up patio chaise lounges in the backyard.

As far as I can tell macrame is a combination of crochet and the weaving technique I used above (which was made up as I went along--no special tricks here), and I'm hoping not to be cursing the project halfway though.
Have any of you made macrame lawnchairs? Any tips would be appreciated!
Labels:
crazy town,
macrame
Our New House: Outdoors, The Before

The front of the house really needed nothing major. Some attention to the existing shrubs and new flowers in the flagstone planter that lines the front walkway and we were good to go. And, how awesome are those Japanese Maples? We love them.

The backyard, however, was another story... What you can't see in the photos are the hundreds of beer bottle caps, cigarette butts and and ant traps that I spent forever picking up (and am still finding!) The area above had been used as a special type of garden that apparently required lots of scary rusty wire to keep everything secure. Those wine barrel planters were disintegrating and rotten, and the cinderblock shed had a leaky roof (although was otherwise in great shape).

Here you can see the patio looking into the family room. The only real item of note here is that group of white wires at the upper corner of the window--that's where the outdoor television was! Also the backdoor just to left of the window had a peephole. Because everyone needs a peephole to the backyard--especially one that is more secure than Fort Knox.

This was perhaps the most special corner of the yard... Not only a doughboy pool (which was removed before Henry ever had a chance to see it!), but a very clever deck made from rotten, termite-infested stumps with plywood on top and covered in nasty brown astroturf.

And, who doesn't love a palm tree?

And more rotten stumps?

This area here leads from one of the two driveways out front right back to the area where the hillbilly pool once stood. Eventually, this will be a shop for Josh. Since the yard is an L-shape (the house is rectangular and sits on the front left portion of the lot if you are facing it from the street), we can use this whole side for a shop/garage/access area and still have a huge section for the lawn, patio and garden. Perfect!
And, now you have seen it all in its "before" state and we can move on to the fun part and I can start showing you how we went from Point A to Point B.
Subscribe to:
Posts (Atom)


